The great guide for all who value good grip strength
Introduction
OCR, Obstacle Course Racing, is one of the most versatile and exciting sports in the world. Not only do we have to be good runners, have excellent coordination and be able to make quick decisions. Unlike other running sports, a strong upper body plays a big role in our sport, which also makes our shape attractive. But seriously.... If you are not able to get your body over the obstacles you are in for a very tough race, hard to finish.
But another crucial skill in our sport is grip strength. And it's on the rise, as the obstacles become more technical and grip strength-heavy. Maybe it's the popularity of Ninja Warrior, maybe it's not. The fact is, that in OCR you certainly need a good grip strength and grip strength endurance.
You need grip strength in OCR all the time and often at obstacles where you don't expect it at first glance. Let's just take the example of Spartanrace, a format that is not famous for having particularly grip-intensive obstacles, but which most of us run.
Multi-Rig, Rope Climb, Farmer's Carry, Tyrolean Traverse and Monkey Bars but also Z-Wall, the Inverted Wall and many other obstacles, they all require a good of grip strength. The longer the race, the more grip strength endurance is needed.
Du musst Dir immer bewusst sein, dass Dein Körper nur so stark ist wie der schwächste, gerade benötigte Muskel. Und das ist im OCR leider oft die Griffkraft denn die Muskelgruppen der Unterarme sind nicht besonders groß.
You must always be aware that your body is only as strong as the weakest muscle you need. Unfortunately, in OCR this is often the grip strength, because the muscle groups of the forearms are not particularly large. I always say "Grip wins races!"-“!
And that's exactly what this is all about. You'll get everything you need to build and develop your grip strength and grip strength endurance in this course.
At the beginning I will introduce you to the theory of grip strength building, then you will get a detailed 12-week plan that will make you really fit for the rigs. If you follow this plan consistently, then the obstacles will no longer cause you any problems. By the way, a firm gorilla grip is not only an advantage in OCR. A good grip also makes you a hero at barbecue parties when opening seemingly undetachable jar lids and caps ;-)
Well then, let's get for it!
Notes about this course (attention advertising!!!):
Creating this tutorial took me many days of writing and even weeks of studying books. I supplemented the acquired knowledge with my own experiences. Actually I wanted to make an ebook out of it, but then I had the feeling that with the outbreak of Corona this tutorial will create more added value if you get it right away. So it became free.
In addition to this tutorial, I have created a complete 12-week grip strength training plan that you can purchase now for $15. It includes this complete tutorial as a PDF and additionally the 12-week gripstrength training plan.
Also, you will find numerous product links to Amazon in which I (should you buy something from it) earn a few bucks. I think that's fair and I do not need to be ashamed of it, because I will probably not rich 😉
However, I have selected only such products that I have tested myself and have had good experiences. Mostly it is relatively inexpensive products, because I myself usually buy very cost-conscious.
I would also like to draw your attention to my small OCR clothing store "OCR meets Trailrunning". Maybe you will find some nice things there that will make you happy. OCR Kleidungs Shop „OCR meets Trailrunning“ make attentive. Maybe you will find some nice things there that will make you happy.
Why you need a good grip strength in OCR
If we always had simple conditions like a nice 15K run with 15 obstacles in dry weather and bright sunshine, then a reasonably trained grip strength would be enough to overcome most obstacles. But can you remember the OCR European Championships in Poland or Denmark, the OCR World Championships, the OCR Series or Toughest? A "reasonably trained grip strength" is no longer enough! At the OCR European Championships, less than 10% of the starters kept their tape!
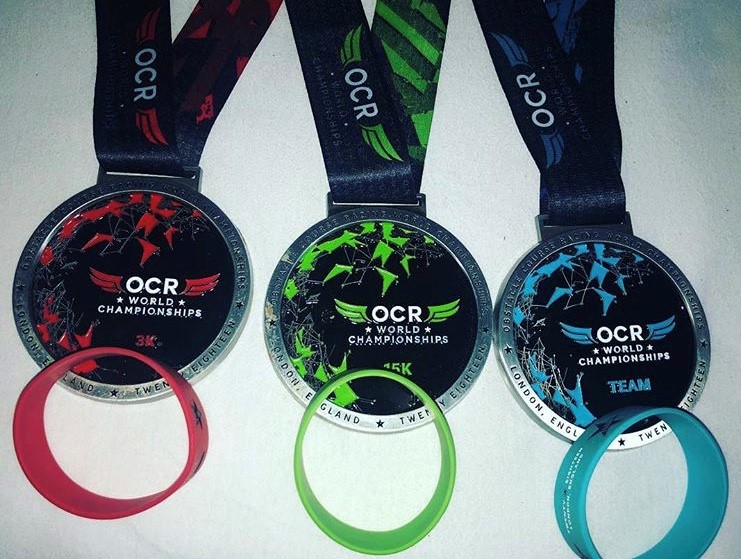
Who of you was in England 2018 at the World Cup? Especially at the main distance (Saturday) the weather was merciless. It was raining cats and dogs and the obstacles were wet and slippery after each runner. You have to have a firm and secure grip to not fall off. Obstacles that were still feasible the day before during the short distance because it was dry then, became almost insurmountable.
Remember:
You spend so many hours training your technique and endurance. Isn't it a shame if you don't take your painstakingly built skills to the track just because your grip strength isn't strong or enduring enough for you to hang safely in the obstacles even under difficult conditions?
Please think about a Spartan Race! Is the uncertainty of the Multirig, Twister or Olympus really worth 30 burpees? Be honest with yourself! At a short distance (sprint), you only have a chance at a podium finish if you have good grip strength, because it's hard to make up for 30 penalty burpees. Doing burpees twice will easily cost you five minutes of time. You'll have to be much faster than others to make up for that! Don't let it come to that and train your grip strength!
But that's not all, let's think a little further....
Regardless of your body weight, the muscles of your back, arms, hands, shoulders and core all contribute to your ability to successfully hold or squeeze things.
It's not the size of these muscles that matters, but their strength and endurance. Look at the lanky climbers. They don't have pumped up muscles, but they hold their weight seemingly effortlessly. Strong grip strength also helps you interact with other muscle groups. You'll quickly notice that as your grip strength increases, other movements are performed more smoothly and safely. In our body, muscles work together as so-called "muscle loops" and ensure the most efficient movement possible. For you, this means that building grip strength is also part of good basic fitness.
Good reasons for a good gripstrength
- Hangelhindernisse
aller Art kannst Du mit Griffkraft rocken. - Griffkraft
ist meist das „schwächste Glied der Kette Deiner Muskelschlingen“. Das
heißt, dass oft für den Körper wichtige Übungen nicht sauber durchgeführt
werden können, da die Griffkraft als Erstes nachgibt. Ein Beispiel sind
z.B. Deadlifts - Vielfalt
im Sport. Ein Körper hat über 600 Muskeln, die sollten auch trainiert
werden, sonst bist Du verletzungsanfällig.
Und genau das ist es, worum es unter dem Motto „GRIP WINS RACES“ geht. Wir wollen Deine Griffkraft im OCR, also im Spartanrace, Strong Viking, Toughest oder auch für internationale Wettkämpfe wie die Europa- oder Weltmeisterschaft, verbessern!
Why is grip strength training in OCR "special"?
You need a lot of grip strength in OCR, but in other sports as well. Nevertheless, the requirements in OCR are quite different from other sports, such as bouldering / climbing. We have to train specialized for our sport, so in OCR grip strength endurance plays a big and crucial role if we want to be successful. Our goal in OCR is to run as flawless a race as possible because penalties cost time and possibly the band. This includes the perceived and actual safety at the obstacles. And especially the technically demanding obstacles require great endurance of grip strength, because every single obstacle drains our strength. In order to last until the last obstacle, we need a lot of grip strength endurance.
To understand the special demands on grip strength in OCR, we need to understand what is not our goal. We don't need to be able to hang from a bar for 10 minutes, drag a Farmers Walk with the heaviest weights for miles, or master the most difficult boulder walls for two hours at a stretch.
You want to become a better OCR runner, and you want to do it as purposefully as possible, because you have a lot more to train than just grip strength.
But to get us right. Of course bouldering, farmers carries and even dead slopes belong in a training plan, but it's all about the "how". It's about efficiency.
You've probably long since overcome the grip-intensive obstacles such as a rope, monkey bars or even low rigs and high rigs without any major problems, but what if your forearms are already thick and full of lactic acid? What if one obstacle after the next awaits you, like at the OCR European Championships in Denmark or Poland? Then it quickly becomes a different situation!
It's no wonder, because the muscles that hold your entire weight while hanging are quite small and tire very quickly. So it is very important to train them specifically in endurance and to be able to recover them during a race.
What does "grip strength training actually mean exactly?
The muscles of your forearms are a combination of muscles for strength and muscles for endurance. The key, however, is how your nervous system addresses these muscle systems.
Your forearms are addressed by neurons, and these neurons condition different motor skills. This means you need as many neurons as possible and, most importantly, the right ones. We should train as close as possible to the needs of our sport in OCR training (and this also applies to grip strength training), because then we build exactly the type and amount of neurons we need in the race.
In OCR we lift heavy things, climb walls, shimmy on different rigs and carry things like water canisters or round stones that are difficult to grip.
And these are exactly the things you need to practice over and over again in training, because then your body builds up the required strength and endurance neuronally but also muscularly. Your body learns how to grip things more efficiently in order to maintain endurance for as long as possible. This is one of the most important aspects of grip strength training, variety!
And this is exactly where we want to help you, and give you in the first part of this tutorial different grip strength exercises for
- your gym (Crossfit or fitness studio)
- at home
- your training ground.
You should get the knowledge that really makes you better
When we talk about the muscular side of grip strength training, we automatically talk about training the flexor and extensor of your forearm. The flexor of your forearm is responsible for the flexion of the required joint (mostly wrist and fingers), the extensor is responsible for the extension. Make a fist and squeeze hard! Grasp your forearm firmly with your free hand and feel the tension in the muscles. And now move your fist up and down alternately. What do you feel? When you bend your wrist down, your flexor is working, when you hyperextend it up, your extensor is working. Actually simple, isn't it?
You have to train both muscle groups in a balanced way.
The different types of grip strength
In OCR, you need several types of grip strength. In the literature you will find different distinctions, but for our purposes the following classification is useful:
- Crush Grip – Krümme Deine Finger
zu einer Faust und drück so fest zu wie Du nur kannst. Das ist die Basis
aller Griffkraft. - Terminal Grip (Endgrip) – Dieser
Griff ermöglicht es Dir die Faust komplett geschlossen zu halten, auch
wenn Du z.B. an einem Seil ziehst, den Sled Drag ziehst, den Sandsack am
Hercules Hoist hochziehst und an der Tyrolean Traverse hangelst. Die
größte Belastung bei diesem Griff lastet auf Deinem vierten und fünften
Finger (Ringfinger und kleiner Finger). - Closed Grip Hold (Die Kraft den Griff
geschlossen zu halten) – Hier geht es um die Kraftausdauer die es Dir
ermöglicht einen Farmers Walk zu bewältigen, die Monkeybars zu hangeln
oder Klimmzüge zu machen. Der Closed Grip ist eigentlich eine Erweiterung
des „Terminal Grip“, nur dass Du beim Terminal Grip eher vertikal hälst
(also z.B. ein Seil), während Deine Handhaltung beim Closed Grip eher
horizontal ist. Das heißt natürlich auch, dass die Belastung hier auf
allen Fingern gleichmäßig verteilt ist. Und genau diese Tatsache kann
einen entscheidenden Unterschied machen, wenn man etwas sicher unter Volllast
halten muss. Der Zeige- und Mittelfinger sind (im Verhältnis)
normalerweise nicht so kräftig wie der Ring- und kleine Finger. Deshalb
solltest Du z.B. mit einer Hantel öfter mal so trainieren, dass Du die
Hantel nur mit diesen zwei Fingern (Zeige- und Mittelfinger) hältst. - Pinch Grip – Diese Art der
Griffkraft wird oft als Fingerkraft bezeichnet. Es ist die Kraft die Du aufbringst
wenn Du mit Deinen Fingern gegen etwas drückst. Es geht also die Kraft
Deiner Fingerspitzen um etwas (manchmal auch Dich selbst) zu halten. Du
brauchst dies z.B. bei der Z Wall Traverse. Hier drückst Du Deine Finger
fest an die Holzklötze damit Du nicht herunterfällst. - Open grip / lever grip – Hier
geht es um den Griff Deiner offenen Hand. Du kannst also bei dieser Art
der Griffkraft nicht vollständig um einen Gegenstand herumgreifen. Du
versuchst also durch eine kräftige Flexion Deines Griffes einen Gegenstand
zu offen zu greifen. Dies findest Du z.B. bei Hindernissen wie dem Tire
Flip, dem Atlas Stone, Bucket Carry aber auch bei jeder Wall bei der Du
Dich in der „L-Position“ Deiner Finger halten musst weil sie sonst zu dick
ist. Du musst diese Art der
Griffkraft immer dann anwenden, sobald Du etwas nicht voll umgreifen
kannst, es aber kontrollieren musst. Deshalb ist es sinnvoll, den
Durchmesser Deiner Trainingsgeräte (Hantel, Klimmzugstange, Farmers Carry
etc.) immer wieder mal zu erhöhen. Dies geht am besten mit Hilfsmitteln
wie z.B. den Fat Grips. Beim Hebelgriff werden oft die Hand- und Fingergelenke
mehr gestresst als die Fingerkuppen.
For a good OCR grip strength training you have to train all these grip strength variations, whereby they partly also overlap.
The plans that you find in the relevant magazines are unfortunately very dominated by the training of the forearm flexor. This is good and important, but I would like to point out that a one-sided training of the forearm flexor leads to the underdevelopment of the extensor, which leads to wrist and elbow injuries and prevents you from reaching your full potential. That's why we train balanced in this plan! You should be able to do your sport for as long as possible, and this includes a healthy and balanced workout. Of course, this also applies to grip strength.
General principles of grip strength training
Effective grip strength training means more than just training the directly affected muscle areas of the forearm. The key to your perfect grip strength training plan is balance and variety. The most important thing is to avoid injury and muscular imbalance.
In order to be able to safely tackle any obstacle in OCR, no matter how difficult, targeted, supportive strength training of the entire body (upper body) is necessary in addition to grip strength training. However, I will only discuss this in passing, as it would go beyond the scope of this guide.
But imagine you get a really heavy rig. To handle it quickly and safely, you need more than just your grip strength. You need an optimal interaction of the muscles of your entire body, because you must always be able to find an optimal solution in the rig. This also includes mental freshness.
OCR challenges you more than other sports in terms of your strength profile. So you have no choice but to work on your maximum strength, strength endurance and explosive power. But that's not all, your muscles need isometric, concentric and eccentric-concentric stimuli to develop optimally.
Your body quickly gets used to a movement and quickly becomes more efficient at performing it. It is lazy and tries to achieve the desired result with as little effort as possible. That's why it's important to vary the exercises in your workout so that you set particularly effective training stimuli. If you always reel off the same training exercises, your strength gain will stagnate. So you have to train in a varied way. Even though everyone is different, the exercises should be changed after 6 weeks at the latest.
"Complex" training means that your exercises should have as direct a relationship as possible to your target skills (here to the required strength profile in OCR). This helps you to develop your strength specifically for the required skills. The decisive factor is not the greatest possible strength of a single muscle but the optimal interaction of your "muscle loops". Muscle loops are groups of muscles that are functionally coordinated to ensure an economical movement. In climbing as well as with the rigs in OCR, these are mostly the so-called "pulling loops". In order to train these optimally, exercises with one's own body weight as resistance are optimal.
Strength training machines are made to train a muscle, not a movement. For this reason, machines have limited use in the gym. Nevertheless, we do not leave them out in this guide, because we know that many of you like to train in the gym.
Exercise with appropiate resistance
It is very important that you carefully choose the load stimulus for your exercises. For example, if you can already do 10 clean pull-ups, it doesn't make much sense to do 2x5 repetitions during training. In this example, you could, for example, increase the number of repetitions, work with additional weight (e.g. a weight vest), change the diameter of the pull-up bar or make some other change to the load stimulus.
On the other hand, getting into a much heavier exercise such as a single-arm pull-up is only possible if you reduce your body's resistance by using a weight-relieving device (such as an elastic band). This is what we mean by "adequate resistance." Challenge- but don't overchallenge yourself!
Performance gains are not a straight path to the top but rather like a staircase. Only when you climb a step and continue training, you can take the next step. Your (grip) strength must be built up systematically, so you must increase the demands gradually and not too quickly.
By synergists, we mean the muscles that are only slightly loaded in the rigs. These are, for example: the support loop of the upper body and some muscles attached to the shoulder blade. You can certainly understand why it is so important to train both your grip strength and these "supporting muscles" in a balanced way. You are promoting injury free training and promoting your functional and economical movement. So you should dedicate 15-30% of your strength training (depending on the training phase) to exactly these muscle groups, even if you "actually wanted to train grip strength". Regarding the resistances, the above applies analogously, of course.
Die principles of any training
A warmup ideally starts with an activation of your cardiovascular system. Loose running would be ideal here. If you don't have the opportunity to do this (e.g. in a crowded gym), then do jumping jacks. In the gym, rowing is a great way to warm up. Now you should incorporate a few coordinative exercises (e.g. triple steps outward, inward) and then some mobilization. Before you start with the exercises, first train at low intensity and only then increase.
Clean exercise execution takes precedence over strength
An important rule is that you always perform exercises that require a lot of technique (e.g. exercise on the rig or on the boulder/climbing wall) before exercises that contain mainly conditional components. This means that complex training forms always come before rough strength units!
The connection between grip strength and a strong shoulder
There is a crucial connection between good grip strength and a strong shoulder (subscapularis muscle). If you have a weak shoulder, we recommend you start by strengthening the shoulder muscle. The basic rule is: first shoulder stability, then grip strength! The more stable your shoulder girdle is, the better your grip will be.
Some exercises to strengthen the shoulder::
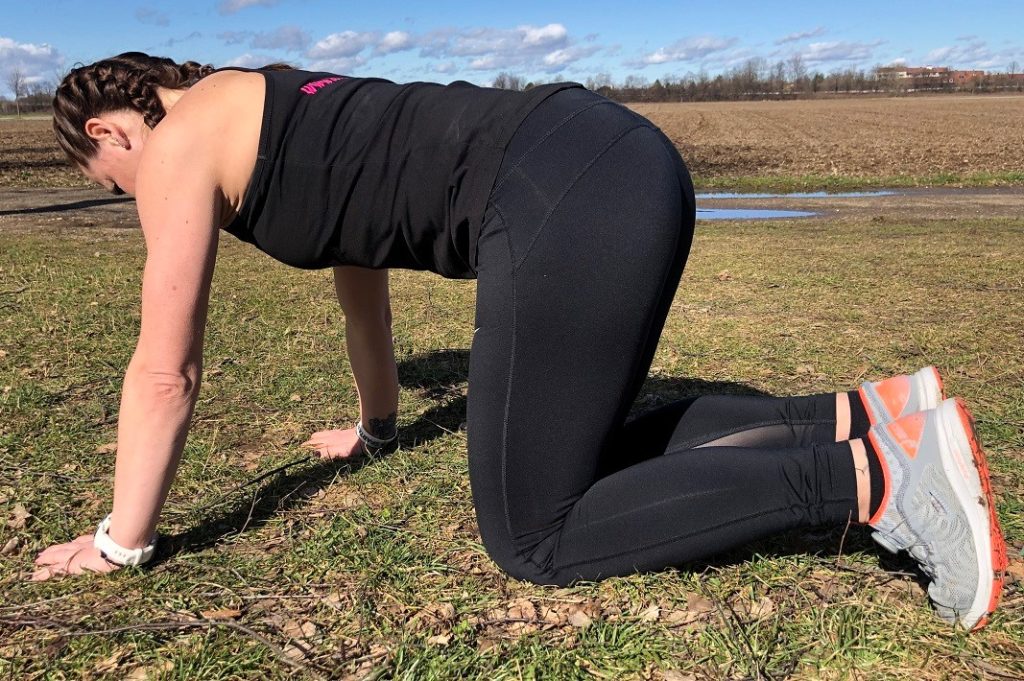
In your build-up phase, you should perform about 3 sets of the bear pose with about 45 seconds of hold time:
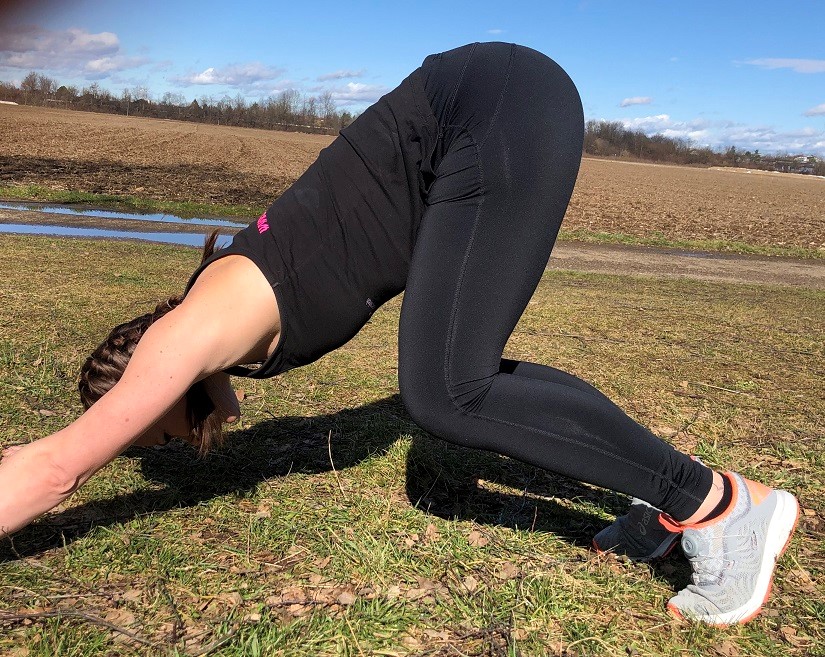
3. take your shoulder blades backwards
4. lengthen your spine and bring your chin inwards so that your head is also in line.
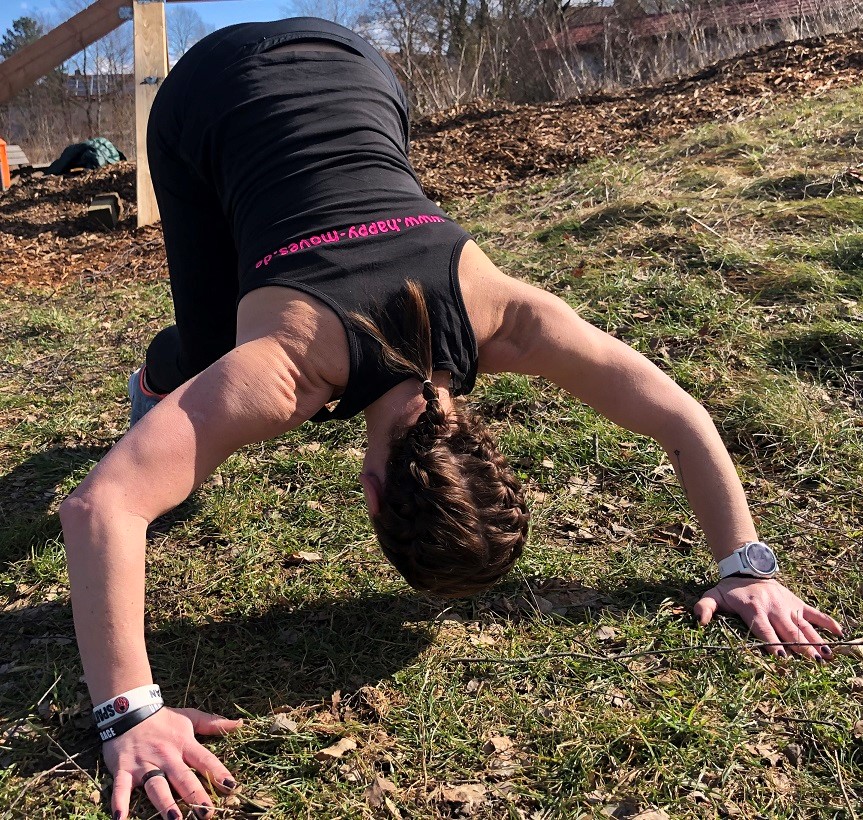
6. avoid rounding off the back
Extensor Training
Now please ball your fist once more, open it again and stretch out your fingers. When you open your fist and stretch your fingers, you use the extensor. And this muscle is usually weaker and needs a little more training. When you make these guy stronger, you not only improve your grip strength, but also make them more balanced, healthy and well-rounded. You'll avoid injuries and strength deficits in your fingers and forearms.
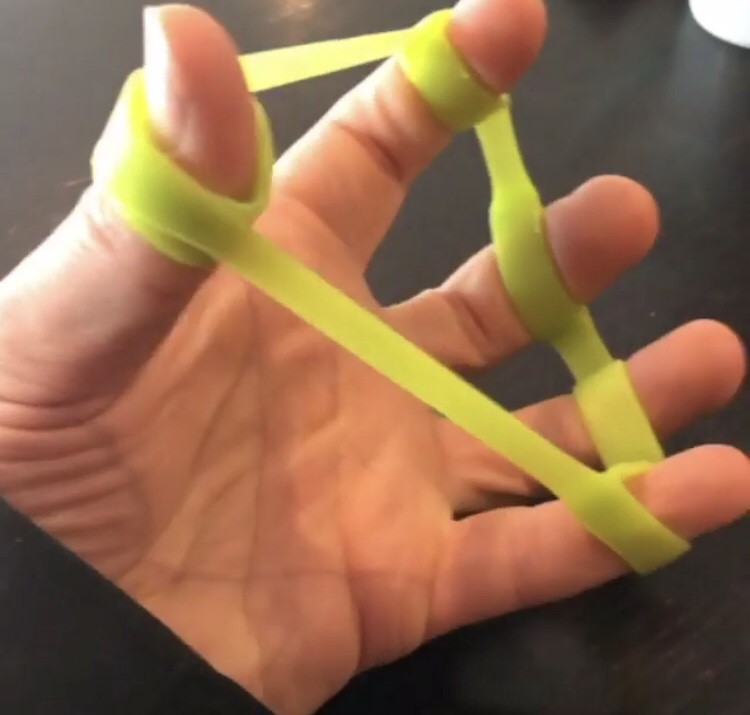
The best exercise to train the extensors is to put a rubber band over the fingers and thumbs and stretch them outwards. The problem with this is usually that the stronger fingers do the work for the weaker ones and we don't really want that. Fortunately, there are now finger bands that have different strengths and therefore train the fingers all equally.
I can recommend the Moko finger trainer from my own experience. I tested this myself and had to start with the yellow one (which is the lightest). But you get better quickly..

Integrate this training into your grip strength training as a fixed component when you train the flexor. For example, do 3x30 repetitions. You can also incorporate this on break days.
I personally use the "Moko Finger Trainer", which is available for cheap money. But of course there are many different providers.
Isometric vs. dynamic grip strength training
I won't go too deep into the differences between isometric and dynamic training, but here's what you should know:
Isometric training occurs when the muscle is activated, but the muscle length and angle of the affected joint does not change during the workout. So you fix the muscle in a certain position. Examples include planks, wall sits, dead hangs, etc. In isometric training, you most often change the leverage, the duration of the exercise or the weight of the external training device.
Dynamic exercises are any form of movement where you run, squat, or do pull-ups, for example.
I would say that obstacles like monkey bars, rope climb or even the twister is a combination of isometric holding and dynamic grip. And yet I think the isometric portion plays a bigger role. Holding and swinging require isometric holding strength. Of course, you also have to let go and re-grip, but the greater proportion of time in the obstacle clearly goes to the isometric holding force, in my opinion.
The reason I point out the difference between isometric and dynamic training is that there are differences in training.
The results of studies show that a dynamic training mode resulted in an increase in dynamic endurance, but NOT in isometric endurance or maximal strength.
This means that just repeatedly squeezing some grip strength equipment and rubber is not targeted enough for obstacle course running. Training, like everything else, should be sport specific and replicate the demands of different obstacles.
A good mix of dynamic training and holding positions will ultimately make you a well-rounded "grappler"
Exercises for good grip strength:
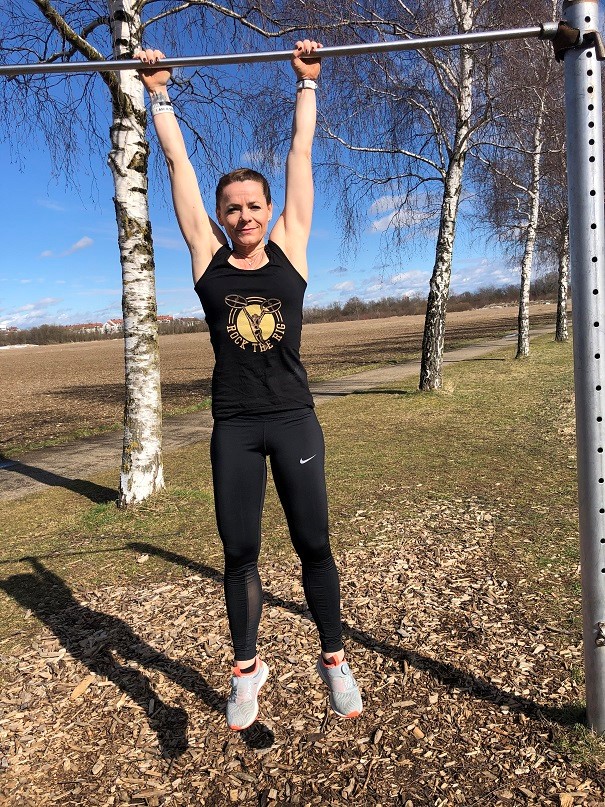
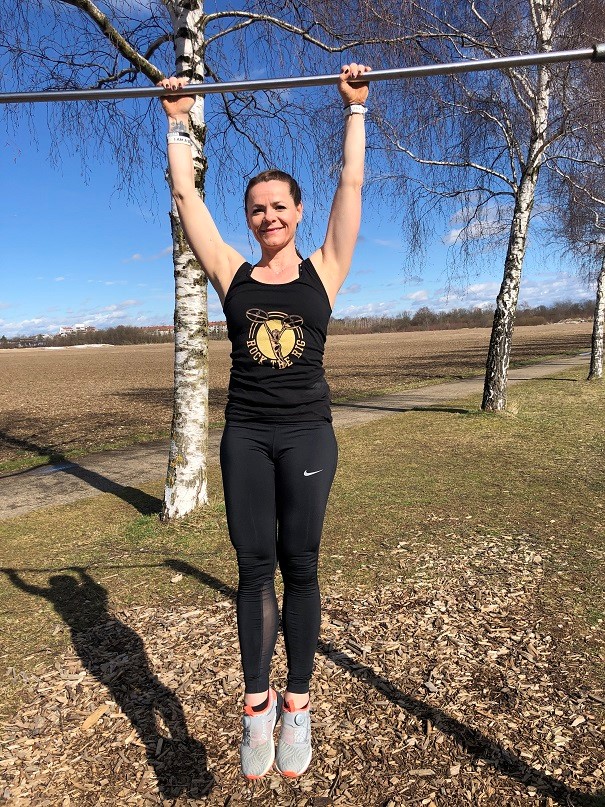
The "deadhang" is one of my favorite exercises for building isometric grip strength. There are two basic types, the "active deadhang" and the "passive deadhang".
In active deadhang, you are actively pushing your shoulder blade (scapula) down and pulling it back so that your shoulder moves away from your ears.
In passive deadhang you are completely relaxed and your ears should be directly against your shoulders.
I advise you, especially if you are still in the beginning and your shoulder is not yet perfectly trained, to use the active deadhangs. You protect yourself from injuries, because the protective muscles of your shoulder are not yet fully developed at this stage.
Performing deadhangs is not difficult. Just take your arms upwards ("natural width"). As described above, you should actively tense the shoulders, especially in the beginning. Ideally, the abdomen and gluteus (buttocks) should be properly tightened and the hands should virtually "dig" into the bar.
Basically, you should strive to develop your ability to hang over time. It's actually quite simple. Think about the maximum amount of time you have to hang in a rig. Let's say 2 minutes. So that should be your minimum amount of time that your grip strength needs to perform. And of course you should approach this slowly. This time is your goal!
My favorite deadhang exercise is the following:
- Hang until you feel like you're going to fall off for the next 10 seconds. That means you don't hang as long as you can!
- Rest for 30 seconds
- Do the whole thing again. Do this game until you can't hang for more than 10 seconds.
But of course there are many other exercises such as: "collecting" a certain amount of hang time. With my group, for example, I have introduced a "Spartan 300" grip strength training. Here the athletes have to collect 300 minutes of hanging. Modifications to the type of hanging are allowed and useful.
Modification von Deadhangs…
Deadhangs can be more and, of course, can be modified:
- The diameter of the pull-up bar can be made thicker. You can use the "fatgrips" for this purpose, for example.

- Increase time - just hang longer
- Use weights. This can be a weight belt, but also a weight vest. Also a backpack can be used in outdoor training

- Alternating hands (taking only one hand, the other hangs down). These are called "alternating grip hang" in English. Release one hand and slap your thigh. Then switch hands and clap with the other hand. This will prepare you to hang on one hand more often in the race and this will not be a problem for you in the future.
- Bent arms. Try to hold your weight as long as possible with bent arms. Vary your grip by putting your fingers forward in the first round (chin-up grip) and towards you in the second (chin-up grip). Of course, you can also do this while hanging, adding a dynamic part to it.
- Hanging on a rope or towel. The added value here is the different grip positions of your hand. Your muscles are trained evenly and you consciously train a vertical grip, which you also need in the race (e.g.: with the nunchaks).
- Hanging on Cannonball Grips or other Ninja Warrior grips (e.g. Nunchacks)

- "Toes to sky": In this exercise you hang on the pull-up bar (or on the rings). Now tighten your abdomen and stretch your legs and feet in a guided movement towards the pull-up bar until you (eventually) touch it with your toes. Please make sure that you also perform the negative movement (lowering the legs) in a guided manner and that you can stop at any time. However, this exercise is considered "advanced".
The Farmers Carry (some call it a "Farmers Walk") should become one of your basic exercises to build your grip strength. This exercise strengthens your grip strength and grip strength endurance, but also makes your shoulder and upper back strong. You need these parts especially for carries of any kind. To perform this exercise, grab two heavy dumbbells, kettlebells, two suitcases with weights, or anything heavy you can lug from A to B. When training the Farmer's Carry, use heavy weights for short distances and lighter weights for longer distances. For the short distances you train your strength, for the longer distances you train your endurance.
My favorite workout for this is quite simple. I set aside a certain amount of carrying time, like two minutes. Now I grab two kettlebells and carry them around as long as I can. When I have to put them down, I stop the clock. When I go back on, the time keeps running. Until I have completed the two minutes.
-
The strength of your core muscles (abdominal muscles, back muscles, lateral abdominal muscles) plays a decisive role. Please train them regularly so that you can perform such exercises without injury.
Of course, you can also vary Farmers Walks. Take two towels, pull them as loops through the Kettlebels and hold the entire weight on the towels. The changed position of your wrist makes the whole thing feel completely different. And that's exactly what will happen to you on different hanging obstacles in the race. By the way, with the "towel method" you can also do Farmers Walks with large weight plates (if there are no kettlebells available).
Pullup Training (not only for your gripstrength)
Pull-ups are one of the central exercises for every climber, boulderer and ocr-runner.
- Supported pull-ups for beginners:An elastic band or chair relieves you of some of the weight and is therefore great for beginners. It is ideal to have a partner who holds the athlete from behind and supports them in the pull-ups. This is extremely motivating and helps both physically and mentally. Another option is the so-called "negative pull-ups". These can be done in such a way that you "jump" the bar, thereby finding yourself in a bent arm position, and then slowly slide down in a guided manner. You can also have a partner lift you up into the bent-over position (helping vigorously) and then lower yourself down on your own in a guided manner.
- Zur Technik: Klimmzüge werden so weit nach oben gezogen, bis das Kinn über der Stange ist. Die Bewegung solltest Du, wie bereits beschrieben, auch beim Ablassen kontrollieren. Die Schultern sollten nach hinten und unten gezogen sein. Vermeide hochgezogene Schultern. Grundsätzlich ist Deine Technik dann richtig, wenn Deine Schultern bis zur maximalen Streckung gebracht werden. Dies halte ich jedoch für Einsteiger suboptimal, weshalb ich Dir empfehle, dass Deine Schultern unter Spannung bleiben.
- Progression options for advanced:: Wenn Du bereits fünf saubere Klimmzüge schaffst, dann kannst Du Dir Gedanken darüber machen, Varianten einzubauen. Dynamisch anziehen, Arm blockieren, Frenchies (normaler Klimmzug, Bewegung wird an drei Punkten gestoppt, z.B. Anhalten wenn die Arme im 90 Grad Winkel sind und 5 Sekunden halten, dann am höchsten Punkt anhalten und 5 Sekunden halten, beim Absenken im 90 Grad Winkel und 5 Sekunden halten, dann nochmal am unteren Punkt rund fünf Sekunden halten. Hierbei geht es vor allem um das Training der „Blockierkraft“, welche Du immer wieder brauchen wirst.
- Pullups with a towel:You wrap a towel around the pull-up bar and do your pull-ups by grabbing the towel. I advise you to include this as a "variation" in your pull-up training, because you have a different hand position here and this will also happen to you in the race. Imagine you have to shimmy on short ropes or nunchacks. There you grip more vertically and not (as usual) horizontally. That's a good thing if you've trained that. Of course you can also use a short rope instead of a towel.
- Fingertips pullups:Try to keep your fingertips as far forward as possible with this variation. This additionally challenges the muscles and grip strength of your fingers. Here, too, you can vary by pulling yourself up a wall (pullups with stretched fingers or hand in "L-position") or by pulling yourself up many different obstacles and therefore inevitably training in a varied way. If you have access to a fingerboard, use it!
- Tips for pull-up training: Pull-up pyramids with a partner (one partner does one pull-up, then the other. Then two, then the other, three, four five... and eventually back again. This can of course also be done with negative pull-ups.
- Ja und dann gibt es noch die Kombination von Klimmzügen und Deadhangs. Du machst einen Klimmzug und lässt Dich langsam in einen Deadhang heruntersinken und hälst diesen ein paar Sekunden, bevor Du den nächsten Klimmzug machst. Natürlich funktioniert dies auch so, dass Du den Deadhang als „Abschluss“ von mehreren Klimmzugwiederholungen machst, Du den Deadhang dafür länger hältst. Wenn Du fortgeschritten bist, dann kannst Du Dich aus dem Klimmzug mit einem Arm möglichst langsam herunterlassen und Deinen Deadhang möglichst lange einarmig halten.
I know that many of you don't know how to pull up and would like to learn. I always recommend my training guests the following ebook/training plan for learning pull-ups:
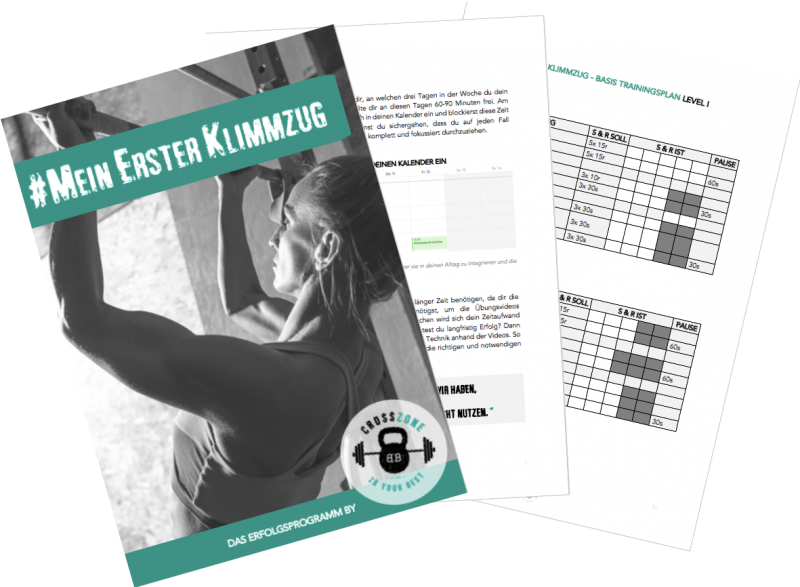
Many of you use the door stick pull-up bars at home. Unfortunately, I cannot give you any recommendations in this regard, as our door frames are not strong enough for this.
I only know the following pull-up bar. This is firmly in the suspension and safe. But again, there are probably many options.

I get asked (mostly by the ladies) about support bands for pull-up training. For this I can give you the following recommendation:

This is an exercise with a kettlebell. You take a kettlebell by the handle and turn it upwards. You try to keep it stable with the strength of your wrist. Now you cover a distance (like in the Farmers Walk). Here the arms should be bent and the joint should be firm (isometric).
If you want to use the deadlift as a grip strength exercise, then please avoid the "alternated grip" (i.e. the right hand from above, the left hand opposite). This grip is useful if you are training strength building with heavy weights, but not for grip strength building. For training your grip strength use the grip from above.
You can keep the number of your normal deadlift repetitions (8-10). But when training grip strength, try to hold the bar at the highest point for as long as possible after the last repetition.
Hold your dumbbells with an overhand grip behind your back, a few inches behind your lower back. Stand tall and let the dumbbell roll over your fingertips. Arms are extended. Next, make a fist and grab the bar again with a closed grip. This is a repetition. Do this exercise slowly and avoid pushing your shoulders forward or using momentum.
Some more grip strength excercises
- Langhantelscheibe
mit den Fingern von beiden Seiten (beide Hände) packen und wie beim
Farmers Walk spazieren tragen - Zwei glatte Hantelscheiben pro
Hand übereinandergelegt rumtragen (Sandwich Carry). Durch die Instabilität
der Hantelscheiben muss ein starker Druck auf die Scheiben ausgeführt
werden. Sonst würden sie auseinander gleiten. - Multi
Grip Hang (Hier wird die Klimmzugaufhängung genutzt um rundherum (unter
Verwendung aller Griffe) aktiv zu hangeln. - Teeter
Totter Bar Tab: Eine Langhantelstange (ohne Gewichtsscheiben) wird in der
Mitte gepackt und aus dem Gelenk langsam und geführt zu beiden Seiten
gekippt - Negativer
Muscle Up: Ihr kennt sicherlich alle den Muscle Up, bei dem das Ziel ist,
in einer explosiven Bewegung aus einer hängenden Position den Körper über
die Stange zu wuchten und in einem „Dip“ mit gestreckten Armen zu
verharren. Diese „Endposition“ ist für uns lediglich der Beginn. Du bist
also im Stütz über der Klimmzugstange und lässt Dich ganz langsam nach
unten (negativer Muscle Up). Dabei greifst Du die Stange so fest Du nur
kannst. Diese Übung ist nicht nur sehr gut für Deine Griffkraft, sondern
stärkt Deinen ganzen Oberkörper. - Fingerspitzen
Liegestütze: Ok, wir sind uns einig, dass Liegestütze nicht gerade als
Griffkrafttraining anzusehen sind. Aber…. Wenn Du die Liegestütze auf
Deinen Fingerspitzen machst, dann kräftigst Du die Muskulatur in Deinen Fingern
und erhöhst die Gelenkstabilität. Das macht für Dein Griffkrafttraining
durchaus Sinn und hilft Dir weiter. Also, wenn Du eh schon Liegestütze
machst (und das sollten wir alle), warum nicht ein paar davon auf den
Fingern?
More grip strength and mobility by hanging
I decided to give you more information about hanging (e.g. deadhangs), because hanging is not only good for your grip strength, but also releases tension and blockages and ensures a healthy shoulder.
Physical therapists and athletic trainers agree that hanging is one of the most important and best exercises for your mobility and grip strength, and positively affects your entire musculoskeletal system.
A good reason to offer you a Hanging Challenge here!
Hanging - the positive effect briefly presented
Hanging is an extremely positive exercise for athletes of all types. Whether you're an obstacle course runner, calisthenics athlete, ballplayer, or not an athlete at all, hanging makes sense for everyone.
- Correction of shoulder joint malposition:Nowadays, we put a lot of stress on our shoulders. For example, if you sit at a desk in the office, your shoulder joint is shifted forward. The same applies, by the way, if you do a lot of bench pressing in the gym. Your shoulder adjusts and realigns itself. But adjustments to the joint can lead to rotator hyperextension or even shortening of the pectoral muscle. Your joint capsule can harden and shorten locally, further displacing the joint. The resulting joint misalignment will completely unbalance the adjacent structures. In the medium and long term, this will lead to pain. Through the distraction (pulling apart of structures by an external force) caused by hanging in gravity, you are pulling your body lengthwise and helping it to release hardening and improve the position of the shoulder joint.
- Release of tension and blockages of the spine:: Bei Blockaden werden meist einzelne Wirbelkörper durch Fehlbelastungen minimal von ihrem angestammten Platz verschoben. Dadurch kommt es zu Verspannungen und Bewegungseinschränkungen der umliegenden Muskulatur. Massagen schaffen zwar Linderung, beheben jedoch die Ursachen nicht. Durch das „Aushängen“ löst Du diese Verspannungen und die umliegende Muskulatur kann sich entspannen.
- Prevention of herniated discs: Nowadays, our intervertebral discs are exposed to very one-sided permanent loads. Sitting and one-sided continuous movements are particularly harmful here, especially when we adopt an asymmetrical posture. When hanging, the intervertebral discs are pulled apart and thus relieved.
- Strengthening hands and grip strength: I don't have to write more about that at this point, do I?
The 30 Days Hanging Challenge
have tried numerous Hanging Challenges, but the one I like best so far is the Dead-Hang Challenge by Darebee.com . This challenge combines load with recovery in a meaningful way.
Try it!
Combination exercises grip strength training and functional fitness
If you are short on time and have to choose between general fitness and grip strength training, I recommend exercises that combine both. These are combination exercises from the field of functional fitness in which valuable grip strength training is integrated.
Have fun!
You already know the Bear Crawl in parts as one of the best exercises for strengthening body tension and your overall strength endurance. Bear crawls are usually used in OCR as one of the best exercises for training to seal under barbed wire. However, you can optimize this exercise. Simply take two dumbbells in your hands, get into the Bear Crawl position and lift one dumbbell while walking forward. Now you have an extra load and you are strengthening your grip strength. As I said.... It just makes sense to train muscle loops and not just individual muscles!
Deadlift-Biceps Curl with Dumbells
We've already learned about deadlifts as an effective combo exercise for building grip strength. But have you ever combined them with dumbbells and a biceps curl? Please take two dumbbells in your hands, stand up straight, shoulders are back, back is straight. Now bend forward with your back straight, arms with dumbbells extended. Now do a classic deadlift, straighten your back again and do a hammer curl with the dumbbells. Of course, it makes sense that you also change from the hammer curl to a normal curl position.
From an upright position with two dumbbells in hand, lower the dumbbells to the floor, hold them in a firm grip and move into a high plank position (push-up position). Dun you do a push-up, then a dumbell row (alternating elbows up once each). Now you go into a squat position and stand up guided. Now lift the dumbbells up until your arms are almost fully extended. As you can see, this exercise is a real full-body workout!
As already described in the Farmer Carry Heavy Endup exercise, take the kettlebell with the weight up and try to keep it stable. Now just do a nice, clean squat. Again, this is a classic full body exercise and a workout of various muscle loops.--
Rope Excercise: Hip Bridge Rope Lower
In this exercise you grab the rope with both hands, take the hips forward and go slightly into the knees, the knees are forward. Now alternate the upper hand with the lower hand down and let yourself sink further and further back until the shoulders are under the hips, then up again.
The rope is very close in front of you, you stand well hip-width. Now grab the rope with one arm and let yourself sink slowly and guided backwards. As soon as your arm is almost stretched, pull yourself up again. Do this exercise until you can't do it anymore, then switch arms. Keep your body tension the whole time!
Grab the rope with both hands and do a pull-up. If this does not work for you yet, then jump up a little, hold your weight briefly and slowly sink down guided. Now alternate the upper with the lower hand. Repeat this until you can't do it anymore.
Tools for Grip Strengt Training
- Handtrainer – Handgripper „Alphaskin“.

Proper use
- Achte bei der Bestellung auf die Spannungsbreite (je
nach Fortschrittlichkeit des Sportlers)- Bewegung langsam ausführen. Schnelle Bewegungen haben
kaum einen Trainingseffekt. Starte mit der maximalen Dehnung (Hand steht schon
vor dem Drücken unter Spannung). Positive Bewegung (drücken) 3-5 Sekunden, 2-5
Sekunden halten, Negative Bewegung 3-5 Sekunden. Negativbewegung ist die
wichtigere Bewegung der Beiden. Wiederholung zwischen 10 bis 15 Bewegungen ohne
Abzusetzen (Griffkraftausdauer) - So kann ein
Training mit den Grippern zum Griffkraftaufbau aussehen: 3 bis 4 Sätze mit
12 Wiederholungen. Die letzten Wiederholungen werden anstrengend, denn Du hast
die Gripper so eingestellt, dass Du sie gerade so zusammendrücken kannst. - So kann ein
Training mit den Grippern zur Griffkraftausdauer aussehen: 5-6 Durchgänge
mit 15-20 Wiederholungen mit einer mittleren Stärke. Du kannst die Gripper also
relativ leicht zusammendrücken. Ich empfehle Dir es nicht zu übertreiben, denn
bei mehr als 15 Wiederholungen steigt die Verletzungsgefahr.
- Bewegung langsam ausführen. Schnelle Bewegungen haben
I don't know the real name of this device, unfortunately. From time to time you can find a wooden version in fitness studios, but I have here a very cheap construction manual for the use of a plastic tube from the hardware store (costs less than two bucks).
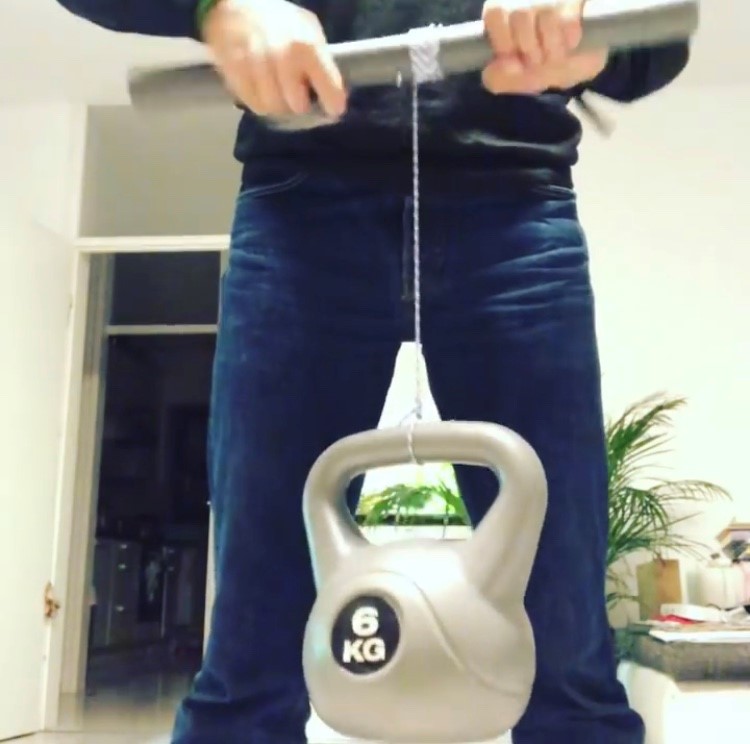
With the Plastic Pipe you train your brachioradialis, i.e. your flexors (hand flexors). The thicker the diameter of the pipe, the more difficult the exercise.
Of course, the same applies to the weight of the dumbbell/kettlebell you hang from it! For the beginning I advise you a diameter of about 4cm and a weight of 4-5 kilograms. However, this is individually different (depending on strength and previous experience).
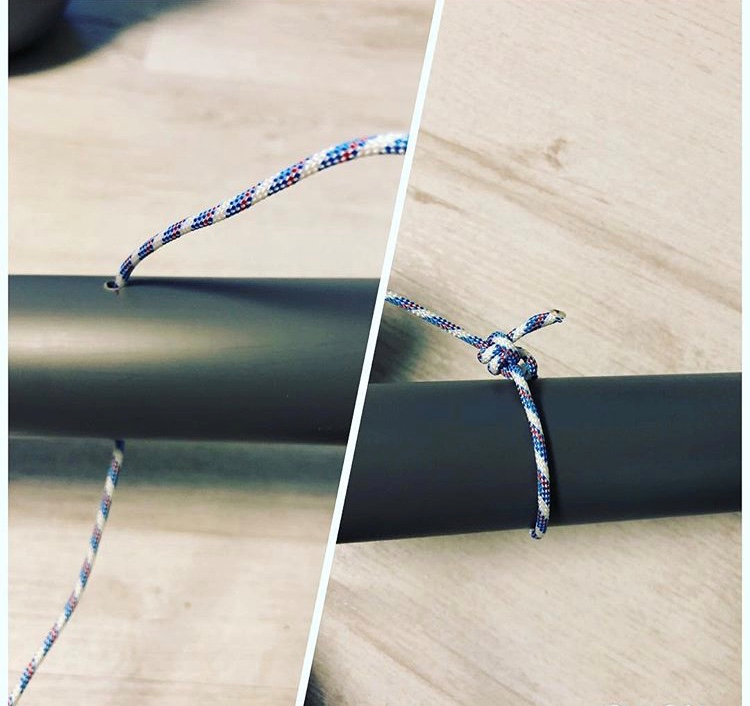
Building instructions for a Plastic Pipe (picture instructions)
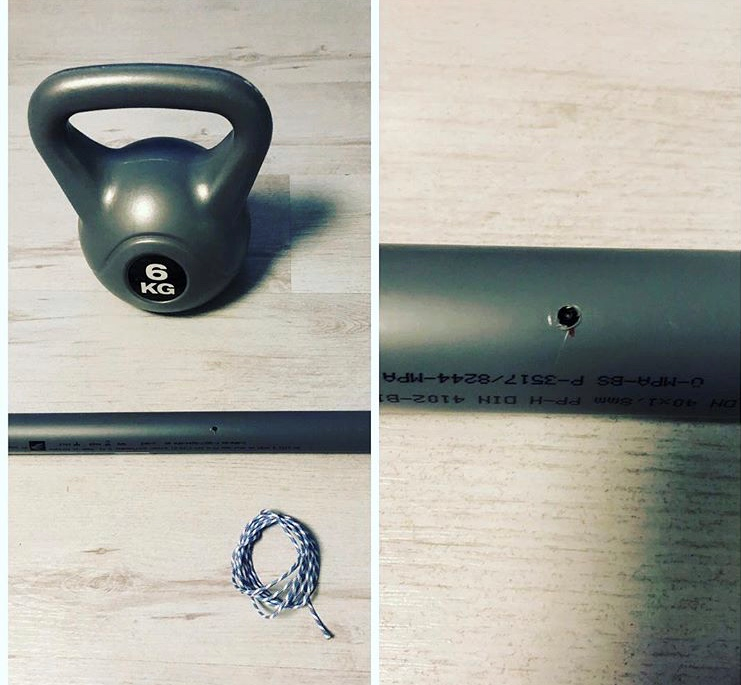
You need a plastic tube (about 4cm in diameter), a strong string and a weight (e.g. kettlebell between 4 and 6kg).
- Fat Gripz: With Fat Gripz you can increase the width of your pull-up bar (or dumbbells), making it harder for your hands to hold the grip. This means you can make your grip strength training more efficient with Fat Gripz. Especially if you train more often with dumbbells, you can use the Fat Gripz to strengthen your biceps and your grip strength at the same time.

Obstacle specific grip strength training for OCR
As mentioned before, it makes little sense for your competence on the obstacles to simply be able to hang from a bar for 10 minutes if your technique on the obstacles is poor. Sure, the grip strength endurance and grip safety is elementary, but without technique it will be nothing....
That's why I can only advise you to practice on the obstacles as often as possible, because safety on obstacles is much more than just a strong grip.
The more you practice obstacles, the safer you will become!
Of course, I mean that you should go shimmy, climb ropes and overcome obstacles of all kinds as often as possible. Shimmying in all its forms is the basis of your training. For this purpose, your whole environment is a training ground. Playgrounds, calisthenic parks, but also branches, walls and ledges of all kinds should be welcome training opportunities for you from now on.
I think you understand my point.
Nevertheless, I have picked out a few nice training suggestions for you that will also help you:
Sled Drags – Pulling as a Teamevent
When you pull on a rope or chain, you activate the terminal grip. This means that the ring finger and little finger (4th and 5th finger) have to perform particularly well, since most of the pressure is on these two fingers. That's why this particular grip is called the "end grip", by the way. The main load is on the last fingers at the "end" of your hand.
But now for the exercise:Attach a heavy tire (if you have one, you can also use a metal sled) to a rope. Now one of the team pulls the tire on the rope as fast as possible a given distance and then has to push it back again. Now the second one takes over! If you now have several teams of two compete against each other, then you have a highly effective and very OCR-like grip strength training that is fun for everyone!
I wondered if I should list training with Battle Ropes under "obstacle specific training", but it is being used more and more in OCR as a penalty for not completing obstacles. Strong Viking's OCR Series says „hi guys“.

The fact is, Battlerope training is great for building your grip strength. The OCR Series requires you to swing the Battle Rope for two minutes if you fail the Low Rig. This is a maximum load for your grip strength. It's good that you have trained these in a targeted manner. But also your arms, upper body and shoulders are trained at the same time. That's why Battlerope training is an absolute must!
The classic flipping of a heavy tractor tire is excellent OCR training. Not only does it train your lever grip strength (open grip), you'll find this obstacle in many OCR races. So it makes sense that you train it regularly as well. Remember to keep your back straight and use your legs for most of the effort. Your grip still needs to counter and will get a workout, but this exercise is also great for your leg strength and makes for a tight butt. Incorporate the Tire Flip into your workout every now and then. It's worth it.
I know that most OCR'ers neglect the training of the Wall Climbs, because it is "not so difficult". But please don't forget that you often have to climb over wooden walls that you can't reach around, and your fingers have to stay in an unfamiliar and insecure "L-position". At the latest when it is wet, this becomes a real challenge. Therefore, incorporate many wall climbs into your training. It does your grip strength good and gives you security, no matter what weather conditions prevail during a race.
After a successful grip strength training
Once your shoulder is solid and your grip strength has improved, it's time to incorporate grip strength training into your endurance workouts and running. By this I mean you need to consciously create situations where you need to switch from endurance (with a high pulse and lots of lactic acid in the muscles) to a safe grip. And do that multiple times, because that's how you simulate the real OCR conditions.
An example for an indoor workout
Warmup
200m on the treadmill with approx. 5% incline
Monkeybar or pull-up bar and hang or shimmy there for 30 seconds
run 200m on the treadmill
10 deadhangs with your toes to your fingers
run 200m on the treadmill
30 seconds Farmers Walk with weights
run 200m on the treadmill
20 pullup to chinup grip changes in flexion
Finish your workout with the use of the finger band to strengthen the extensors.
Run out and cool down
Conquer the rigs!
Even if it doesn't suit all of us, the trend is towards harder and harder rigs that require more and more grip strength. Just think of races like the OCR Series by Strong Viking, Toughest or the OCR World and European Championships. It is crucial to rock the rigs!
Therefore, to finish off well, a few basic tips on how you can best master the rigs:
- Move fast!Geschwindigkeit ist eine Folge von
Effizienz“, heißt es. Und so ist es auch. Versuche Dich im Rig zügig
zu bewegen und nutze Dein Leistungsmomentum. Denk immer dran, dass ein
längeres Verweilen im Rig auch mehr Griffkraft erfordert. - Wenn Dein gesamtes
Körpergewicht an Deinen Händen hängt, dann versuche die Ellenbogen
möglichst nahe am 90 Grad Winkel zu halten. Das ist der Winkel in dem Du
die meiste Griffkraft aufbauen kannst und der Dir auch Übergänge zu
höheren Griffen erleichtert. Das heißt aber natürlich nicht, dass Du jede
Monkeybars mit angewinkelten Armen durchpowern sollst. Hier kann es
durchaus Sinn machen, den Schwung mit gestreckten Armen mitzunehmen und
technisch mit möglichst wenig Aufwand hindurch zu schwingen. Ich beziehe das eher auf sehr variable
und technisch schwierige Rigs mit unterschiedlichen Tools drin. - Nutz niedrige Ringe und
Seile um Deine Hände bei Bedarf auszuruhen. Wenn Du eine saubere
S-Hook-Technik für deine Beine hast, dann kannst Du auch tagelang ohne
viel Aufwand in einem Seil bleiben ohne Deine Arme zu belasten. Auch hier
gilt „Je fitter Du technisch bist, desto mehr macht sich das im Rennen
bezahlt“.
12 weeks training plan „Grip wins Races“
This 12-week training plan gets your grip strength ready for the OCR challenges ahead. It is structured in 4-week cycles, each of which builds on the acquired grip strength/grip endurance of the previous training period. So I have a request for you: please train the units chronologically as given.
There is one obstacle practice session scheduled per week. If you don't have a suitable obstacle course nearby, be creative and use ropes in gyms, pull-up bars, playgrounds, calisthenic parks etc.
Now also available in english language
„GRIP WINS RACES“ – Unser 12 Wochen Griffkraft Trainingsplan
We developed a special 12-week grip strength training plan that will take your grip strength to a new level. This plan is already successfull tested by obstacle runners and the results have been fantastic. What our testers say about this course can be found at the end of this article.
In addition to extensive information about grip strength training in OCR (this tutorial in a PDF format), you'll get a real, proven 12-week plan for strong grip strength in this course. The exercises are clearly described, illustrated and framed with our videos on our Youtube channel on proper execution and technique.
We worked with a team of OCR'ers and climbers for three months on this course and are very proud of the result. For the price of $8,99, you get over 60 pages of information and training plans on grip strength training for obstacle courses, supplemented by numerous videos. But most importantly, you get a system for improving your grip strength.
We think that $8,99 is a very reasonable price.
Our added value for you is that your fear of difficult obstacles gives way to joy. Make the time at the obstacles your personal quality time!
Mehr Informationen zum Griffkrafttraining für OCR
#2 5 Tools für mehr Griffkraft im OCR
